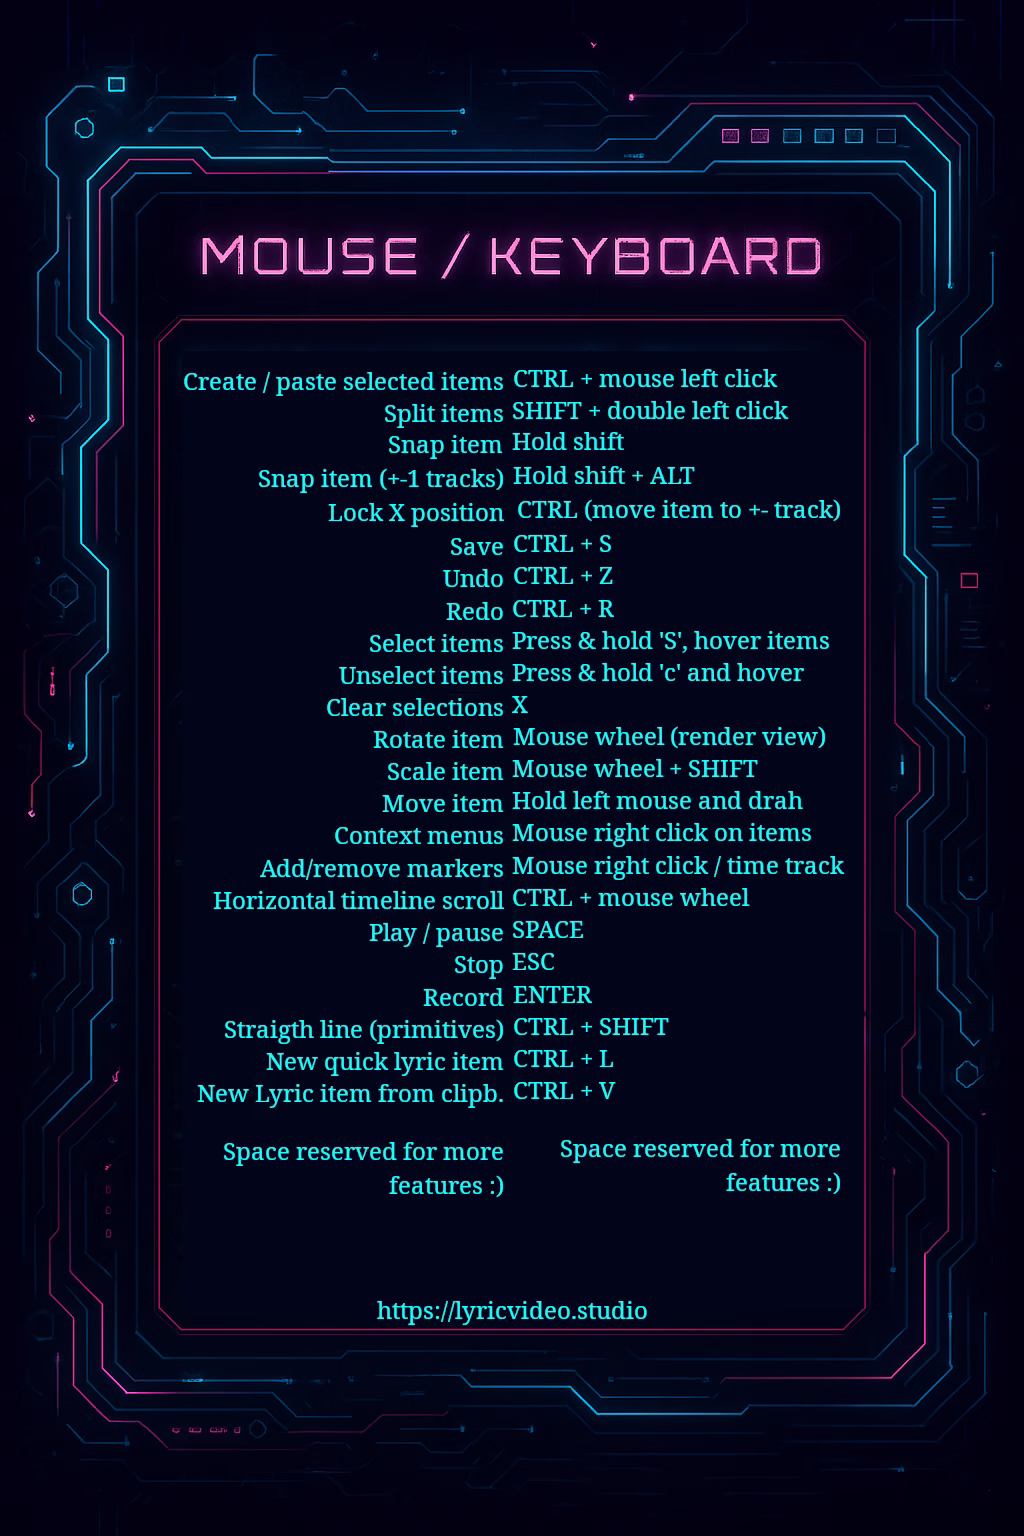
Application itself is pretty easy to operate. Basic functionalities and keybindings are explained in Help -> Controls. However, there are a couple of more “complex” features that need clarification.. See video tutorials also in https://www.youtube.com/channel/UCvZjzCkyqO3AP2hs45lct3A
Use-case text tutorials
-
Using Google AI stack to create music and music video
Intro A lot has happened in AI video (and music) scene since August 2024 when Lyric Video Studio was first released. There was only couple of video API providers, now there’s tens of models. We can also modify videos, use image and audio to create lipsynced videos or even generate the music if needed. And…
-
How to create faceless youtube videos with Lyric Video Studio
Introduction In today’s fast-paced digital world, not everyone wants to (or can) show their face on camera. But that shouldn’t stop you from creating engaging, viral-worthy content. Faceless youtube videos are booming: they’re easier to produce, more accessible, and often just as impactful as traditional videos. Whether you’re a musician, meme creator, or just someone…
-
How to create audio-reactive visualizations for your song
Intro There’s a lot of AI tools out there and new innovations seem to come from that area. But there’s some good old math-related tech, forgotten in the mist of time, that can make your song come alive. If you were 90’s / 2000’s-kid, you probably remember the app WinAmp. It had some cool visualizations…
-
How to create Stranger Things-inspired intro scene with Lyric Video Studio
This step-by-step tutorial shows you how to build Netflix-style intro scene, with big texts and “fly-though” font. First of all, Lyric Video Studio uses system fonts, so before you begin, make sure you have the font installed that you with to use. You can install fonts to your system bu downloading a font and then…
-
How to Make Lyric Video: A Step-by-Step Guide
Introduction So, you finally have the song ready to go. Wondering how those lyric videos, visualized and music videos are created? Visualizing one or more songs is great way to boost your tracks on YouTube / TikTok etc and with the latest technological advancements, it’s no longer costly nor big effort. There’s no more excuses…
Cheat sheets of keyboard / mouse shortcuts for printing
Getting started
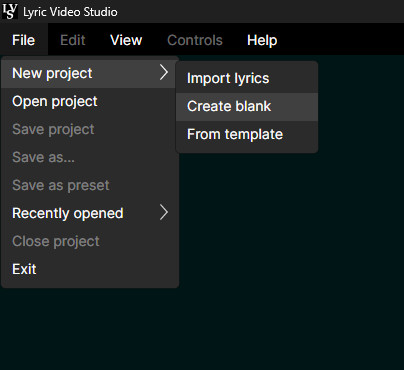
Start by creating a new blank project from File -> New project -> Create blank. App will ask you to save the project file, this is mandatory.
You can drag and drop image, video, audio and text files (including .LRC) from your system to timeline. Items are positioned where you drop them and if you drop image item to video track for example, new track is created
You can also import video or audio by inserting new items to tracks. Menu to create new track is opened with left mouse click. In same menu, there are other track-related options

Depending on the track menu you opened, new track will be created before or after the clicked track. You can re-order the tracks at any time. Image plugins / Video Plugins are the 3rd party plugins that offer more ways to create images and videos to your project

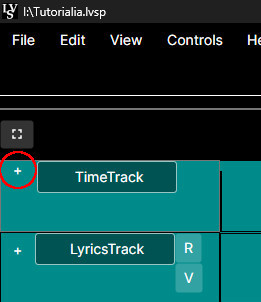
After you have created track (or want to add text items to pre-created lyrics track), just hover over any empty space in the track with your mouse, hold CTRL (control) and left click the empty spot on track to create new item. Menu will pop to right side of the screen, allowing you to choose the source for the item. Lyric track (and usually 3rd party plugin tracks) support importing items to track. That feature is accessed from the same menu where new tracks are created
Selecting and copying items

First, select items by holding down S and hovering over items you want to select. Selected items will go slightly brighter and you can see amount of selected items. Only one type of items can be selected at one, like three lyric items but not three lyric items and one image item. After you have selected items, you can either manipulate those just like single items or you can paste them by simply pressing ctrl + left mouse button on empty spot on the track. Context menu (right click) operations, like delete, affects all selected items. To clear selection, press X.
Importing lyrics
Creating a new project by importing lyrics is the most common use-case for the app.
- Start by creating new .txt file and copy your lyrics there.
- Lyric are imported line-by-line, so each line in txt file represents one lyric item in timeline. As you already know the song, you probably have some idea in your mind how the lyrics should be displayed. Edit the text file and break long lines and words that have big gap between them. You can do this later after importing, but more effort and thought that you use at this stage, the less there is to do in the app
- Select File -> New project -> Import lyrics and select the file you created and saved
- Project and lyric items are now created and you can save the project to your desired location
- You can also do this later, by right clicking lyrics track menu and selecting “Import lyrics”. Remember that this will clear all existing items on that track
- See example file:
If you chose not to import lyrics as new project, there’s two other ways to do it after project has been created
- Drag & drop .txt or .lrc file to timeline
- Drag & Drop audio file to timeline, right click the item, select “Extract text”. This action will open audio-to-text extraction view, using Whisper-models. Notice that extraction speed depends on your GPU. Also, not all languages are supported. And just like human, AI can mishear the lyrics (ref: https://www.youtube.com/watch?v=gg5_mlQOsUQ) 😀 Extract text button is also found from audio item settings
Audio-to-text
Text extraction supports also OpenAi (basically Whisper-1) and ElevenLabs API’s. You need to get your own API key’s for those: https://platform.openai.com/api-keys and https://elevenlabs.io/app/settings/api-keys NOTE: You can use the same Elevenlabs key for the plugin also, but for security and isolation reasons, those need to be pasted separately. ElevenLabs also supports defining limits to keys, so you might want to create separate key for audio-to-text. ElevenLabs also seems to be providing generous free tier, 10k credits/month https://elevenlabs.io/pricing/api


Working with texts
After you import lyrics, all items are shown in gray background. This means that the lyric item is not yet “synced”. There are two ways of syncing lyrics at the moment (more ways may come up later)
Move items manually to their places
- Import audio for video file to your newly created project, this will make the timeline expand to desired length
- Starting from the last item, move item (or selection of items, hold shift and hover over items to select) by holding left mouse button and drag. You can scroll the timeline horizontally by pressing ctrl and using mouse wheel
- This method is bit tedious and not recommended. See the next chapter for much more fun and faster method!
Sync with “rec”
Most fun way of syncing lyrics is the rec & sync-button. After you have imported the lyrics, any gray items are syncable that way:
- Import audio (or video) to the newly created project
- ‘Arm’ the lyrics track with the little ‘R’ button on left side
- Press rec (o)
- You can see the lyric items starting to scroll in timeline, while the first unsynced item follows the playhead.
- When you hear that particular line in the song, press “Sync” button on top of timeline view and keep it pressed as long as you want that line to be visible
- When you release the “Sync” button, the next item will become the “syncing target” and keep repeating #5 until all the lyrics have been synced
- You can stop syncing at any time and continue from the last un-synced item
- Don’t worry if you missed a beat or the line was not long enough, you can manually fine tune the results from the timeline view or even reset the items to their previous state from lyrics track menu
1. Rec, 2. Sync


‘Arm’
Defining font
You can define the font for the texts in many levels. If you want the texts to look the same on all tracks, just define the font on project level, in projects settings (shortcut P). This will apply the same font definitions to all texts
If you need different type of font on all texts on signle track, you can override the project font definition from track settings (+ button on top left of track). You can either copy the project definition or start from the scratch.
Yuo can also define forn for individual text items. Just like for the track,m you can add font override for text items from item settings.
Fonts have wide variety of settings available, including using shader as font color or gradients.
Font background
You can define the background for the font in font settings. In practice, you define primitive for the item to be used as background. Width / Height for the primitive acts as padding in case of font background. You can even set the shader for the background, creating all kinds of cool effects. Below picture has shaders on both font color and background

Karaoke mode
Here’s quick instructions how to achieve karaoke-style texts:
- Create and sync the lyrics
- Set item alignment to Left (top, bottom or middle). This is important step to avoid manual labor on next steps
- Pro tip: You don’t need to set each item alignment manually, you can use multi edit for that. Either select all items in track with right click -> Select -> All or press +-icon on track and click “Edit track items”
- Adjust font etc settings, positions of the texts and everything, because next steps needs to be redone, if you need to change anything
- Duplicate (below) the lyrics track that is synced and ready
- Open track effects from the created track and click “Copy project font definition”. Note, that this is not needed if the original track already had track font override active
- Now, select one lyric item and tap “Word by word offsetting” or from multi edit, select “Apply word by word offsetting”
- Fine tune the the start / end times if needed. Times are relative to total length of the item
3D Text
Lyric Video Studio supports 3D rendered text starting from version 1.5.9. You can enable 3D rendered text from track settings or text item settings. Also, you need to change the rendering engine selection to WGL from Settings -> Audio / Video settings for the rendering to work. Also, make sure you click “Generate all meshes” after changing the mesh settings.
3D text supports three different types of light, textures and normal maps. Multiple different type of shaders are available. App offers one click downloadable package of textures & normal maps. You can find more textures and normal maps from various sources, for example: https://opengameart.org/art-search-advanced?keys=&field_art_type_tid%5B%5D=14&sort_by=count&sort_order=DESC
One special shader, MatCap uses different types of textures, you can find textures for that shader from here, for example: https://github.com/nidorx/matcaps
Quick start
- Create text to lyrics track (ctrl + mouse left click or ctrl + L)
- Click + icon in Lyrics Track and select “Track effects”
- Expand “3D text”
- If you have not yet enabled WGL render mode, you’ll get a warning and 3D text will not be rendered until you change it from Settings -> Audio and VIdeo settings
- Click “Enable 3D rendering”
- First in the list is he rendering settings. FOnt & font color is taken from regular font settings, following the usual priority: Project font definition -> track font definition -> item font definition
- On the bottom of the list is the meh generation settings. YOu can adjust several values. After changing the values, click “Generate all meshes”
- Fair warning: going high, like above 20 in curve steps, will lead to high memory consumption!
- In mesh settings, you can set the Mesh mode to different values. This is equal to word-by-word and letter-by-letter-settings, but behaves bit differently: you can define the offset (milliseconds) per letter or by work, instead you define the end offset from lyric item setting. This means that he lsat letter will be fully visible as endMs – offset-time.
- This feature is very important to remember, if you want to add animations to 3D texts: this makes the effect to apply to letters or words independently, allowing you all sorts of cool animations!


Shadow
Shadow is casted by key light. When key light is enabled and shadow is enabled, you can modify the shadow plane distance and color. Both of these are also animatable. Shadow is of affected by the position of the light and rotation of the item. You can adjust the shadow opacity from the shadow color.
More features for the 3D rendering will be implemented later, like for example more fine-grained lights, soft shadow plane etc goodies 🙂
3rd Party plugins install
Currently all you have to do is drop the dll file to plugin folder of the app and restart the software. You can open the plugin folder from Settings -> Plugins also. Add new plugins only from the sources you trust and read carefully instructions etc that you know what services does the plugin use and how much the usage costs per generated content. In settings, you can also define folder where to scan for new plugins. After adding the folder or adding new plugins, restart the app.
Using crossfades
- Start by dragging the image or video items in timeline so that they slightly overlap
- Click + icon of the track, choose “Track effects”
- Select the crossfade from the right side menu
- This crossfade affects all items in the track and crossfade time is determined by how much the items overlap

Common use cases and examples
Adding lyrics to existing video
Adding lyrics or subtitles to existing video is the most basic use case of the app. See example project here:
Unzip the file to your computer and start up the Lyric Video Studio. Open the .lvsp file and wait for the app to cache the media content
Creating still image ‘idea sketch’
You can also create video using existing audio and generate images to timeline to sketch out the ideas for video or pitch the video to other. Maybe even use it to clarify your ides to whoever is making the initial video for you.
You can now view still images as storyboard. Click on the bottom right of render screen to access storyboard more. Select desired column & row count. Select track you wish to see on the grid and press apply. When you move your playhead or playback the song, the view highlights the image that currently would be shown. Page changes automatically after last image. If you make changes to items in selected track, press Apply to load the changes (this will improve in near future)


Create music video with text-to-video or image-to-video
Bit similar than ‘still image sketch’, you can use still images to generate videos, with Luma Labs Dream Machine or Runway ML plugins. Usually the results are better that way than doing just text-to-video. But also, you can do text-to-video as well, just import the audio and start creating. (example project coming soon). New integrations to image & video generating services will come up as they are made available!
Cut and edit you video footage
Lyric Video Studio is fully capable video editor for editing and combining your existing videos to regular videos as well. You can add captioning / subtitling and export the video on any frame rate or size
Opt-in DropBox support
Some plugins, like Runway ML & DreamMachine, require images used by the service to be uploaded to publicly accessible place. To help with that, you can opt-in for DropBox integration in View -> Settings -> Plugins -> Plugin Content Delivery. When you create video with the plugin, just set the local file as image source (hint: right click on image, then ‘Copy source path’). File will be uploaded to your DropBox account and temporary (4 hours) link will be created for video service to grab the image. Images will not be destroyed, so remember to clean up old images from app/LyricVideoStudio-folder from your DropBox
Fragment shaders
Lyric Video Studio supports also fragment shaders, with SkiaSharp shading language, aka SKSL. There’s some shaders included but you can create own shaders as well. When copying shaders from external sources, be sure to honor the original license.
Shaders can be used with any item that has color definition as well as with images and video. It is important to know that if you use shader that output transparent pixels (like ready made audio spectrum shader), you need to set the item blend mode on. Then try out what is the best mode for your shader.
Couple of good-to-know things for adding new shaders:
- If you want to blend in the shader with image, select Add parameter -> Add image. Usually the iImage parameter controls how much of the texture color is added to shader. Texture is selected from the image or video you apply the shader to. Editor adds also four other parameters.
- iImageDimensions tells the pixes size of inputted image. In SKSL, texture pixels are evaluated with exact coordinates.
- iImage is the texture
- iImageScale vaue holds float value that you can input to iImage-parameter to adjust how musch of texture pixel color is added
- iImageDimensionRatio tells the ration between width and height of the source image and is needed for getting the right pixel from screen. Example to get pixel for the relative coodrinates (uv = two dimensional vector, x & y, 0-1): float2 uvPix = uv * iImageDimensions * iImageDimensionRatio;
- If you want the shader to react with music, like the spectrum analyzer, select Add parameter -> music. That will add two parameters automatically:
- iMusic receives texture, generated from last audio that is played when the shader is rendered. The texture is 512×1 with frequency powers as colors. To get the power of certain frequency, sum R, G & B and divide it by three, to get percentual value:
float sampleR = iMusic.eval(float2(uv.x * 512, 0)).r; - float sampleG = iMusic.eval(float2(uv.x * 512, 0)).g;
- float sampleB = iMusic.eval(float2(uv.x * 512, 0)).b;
- float sample = (sampleR + sampleG + sampleB) * .33;
- iMusicScale float can be used to boost this value if needed
- iMusic receives texture, generated from last audio that is played when the shader is rendered. The texture is 512×1 with frequency powers as colors. To get the power of certain frequency, sum R, G & B and divide it by three, to get percentual value:
Removing backgrounds
There’s three options in Lyric Video Studio for removing backgrounds from videos and one for images.
Using rembg
This option is the most advanced, using AI to remove the background. This doe not require high end GPU, but will be a lot faster with it. To use rembg, you must install additional software and libraries
- Go to Settings, expand “Remove background”
- Click install, this will install embedded python and rembg. This takes couple of minutes, maybe more on slower computers and network connections
- Installation will also prompt for Visual c++ redistributable installation. If you already have it on machine, you can click close.
- Installation includes embedded python (so it won’t mess your own python installation) and RemBg with required dependencies. Installation is done to documents/LyricVideoStudio
- Now the background removal should work when you right click video or image item and select “Remove background
- From settings, you can change the model used for background removal, see model descriptions from here: https://github.com/danielgatis/rembg. When using any model for the first time, RemBg will download the model first, so it takes some time at first attempt.

Remove color from video
This type of background removal is more classic, known also as green screen. Click the “Replace color with transparency” from context menu and UI with couple of simple settings will pop up. Choose the color by clicking the left image. Then adjust the threshold and smoothing to get the best results. Moving the slider will change the preview frame. This operation preservers the original frames. You can adjust the settings again later, if needed.

Use video mask
If you have video mask available for your video, you can use it to remove background. Click on the “Apply video mask”, then select the mask from the center view and click “Process”. Like in color removal, you can change the preview frame. You also have an option to invert the mask.

Object detection and motion tracking
- Right click on video item and select “Generate motion detection data”
- NOTE: You might want to jump directly to step 5, it’s usually faster than trying out with auto-detect
- There are several option to adjust object and motions detection
- Motion threshold: How much the objects change between frames
- Area size filter: how big or small objects are detected. Setting “Min” to 300 means the object must be 300 square pixels in size or larger. If it is smaller, it will be filtered out. Same for “Max”, but the opposite. Setting either value to 0 means that filter is not active
- Same object distance filter: How much is the object allowed to move between frames to be considered as same object. Unit is pixels.
- Same object size filter: How much is the object allowed to shrink/grow between frames to be considered a same object. Unit is square pixels
- Object frame count filter: In how many frames the object must appear. Object might be detected, but only for few frames, so those usually should be filtered out
- Folder to store diagnostics image: Useful when trying to find best settings for videos. Stores the temporary images to disk so those can be analyzed and tried out with different settings. Each frame produces two images. One image shows the black and white difference between frames. The other image displays detected objects drawn as a green outline. This however slows down the process of finding objects
- Click Find objects to go through the video
- Object data will appear after the process is completed. You can delete the objects, jump to the frame it appeared or perform more accurate tracking.
- Tracking the object is separate process, done with different algorithm than “Find objects”. This usually gives better results, but the process is slower. Therefore, it is not done to all objects during “Find objects”.
- You can also mark objects manually and then track them. Just click “Mark object manually.” Give it a name. Then, left click, hold, and drag over the image to select the object. Then, click “Track”
- After you are satisfied with the objects created and tracked, close the view and click on item you with to follow that object. It has to be between the video item and on track below it
- Expand the “Motion syncing”, select the video that you wish to follow. Then select the object. You can adjust the alignment of your item. You can also set the start and end frames. That means you item will remain stationary outside those frames. Clicking the small click icon will set the frame number automatically from current playhead position


Adding timer / countdown to text
You can add timer in middle of text using these two special formattings:
- timer(mm\:ss\:ff)
- countdown(mm\:ss\:ff)
These are the supported formats:
| “d“ | The number of days in the time interval. This element is omitted if the time interval is less than one day. |
| “hh“ | The number of hours in the time interval, ranging from 0 to 23. |
| “mm“ | The number of minutes in the time interval, ranging from 0 to 59. |
| “ss“ | The number of seconds in the time interval, ranging from 0 to 59. |
| “fffffff“ | Fractional seconds in the time interval. This element is omitted if the time interval does not include fractional seconds. If present, fractional seconds are always expressed using seven decimal digits. |
If you wish to set start time other than zero, set up the time in the same format that was in the text. For example mm\:ss:\ff-format in start time would be 01:00:00 to count down from one minute. TIme goes to “Initial time” text field just below the text. With countdown, it’s mandatory for it to work properly
Large Language Model
Large Language Models is supported in the app. Use case is to convert lyrics to descriptive prompts for plugins to process or to improve existing prompts
- LLM Initial instruction: This works as “setup” for the language model and guides
- Lyrics tracks that you can import lyrics to #3
- Your prompt / imported lyrics. Beginning should be what you wish LLM to do for you. Default is: ‘Analyze these lyrics and create storyboard base on that. Prompts should be highly detailed and descriptive: ‘ <lyrics here>
- Prompt history and adding new ones: Whenever you add new or duplicate current prompt, previous one is move to history. You can switch back and forth with < > buttons. History and prompts are save on project level, not in application settings
- Model tools: You can download curated models here. Mistral, PHI-4 and DeekSeek has been tested and verified. See the full list of supported models here: llama.cpp Only .gguf models are supported. After the prompt has been finished, you can prepare the output for export. ‘Preserve lines staring with’-box allows you to customize what is preserved in cleanup. You can also undo the cleanup if needed.
- Model tools now include also text box that allows you to sync prompts to correct places. First, mark the lines that contain the original lyric in prompt output. If the lyrics are wrapped with ” “, add “*” to end of text. When exporting to track, app will try to find the correct lyric items for the prompt. (see picture below)
- Make sure that you lyrics don’t end up with ., that will interfere the detection’s (will be fixed soon)
- You can also improve existing prompts. Select track to import from and click import. The view will now look bit different and you have options to generate new prompt and replace the current item prompt. Generate button will in this case generate new prompts for all items. ANd Replace-button on the bottom will replace prompt in all items in that track.
- Model settings:
- Model folder, where to look for then. This setting can also be changed in Settings-menu. Default value is taken from there in that case. Selected model shows the models in the folder.
- GPU Layer Count increases the performance of LLM in the cost of memory consumption. If this values is too high and GPU runs out of dedicated memory, things will slow down. Keep Task manager opened while trying out optimal values for this.
- Temperature: This is basically the “artistic freedom” of the LLM. Higher the value, more it makes things up. Lower values means it does exactly what is was taught.
- Lastly, when ready, press generate to load the model and wait for results. It has been noticed that sometimes first answer is bland or just repeats part of the lyrics. In that case, just press it again. By design, this implementation of LLM does not preserve the context of previous ‘chat’ you had with it. It is good to know this. So, each generation starts of oblivious what was previously requested. This might change if the future and if I made a stupid design decision, let me know 🙂
- You now have an option to choose to use Mistral AI from cloud. Just select “Mistral API” from models list and paste your API key from https://console.mistral.ai/api-keys/ At the time of writing (18/02/2025), using their latest model is free, if you don’t mind sharing your prompts with the French 🙂
- LLM output: This is where the LLM will output. Output varies between models and even between generations. When exporting, each new line is one item in timeline, just like when importing lyrics to track
- Output settings: You can export the output to selected plugin track. IN case the track is capable of doing both images and video, there’s selection which one you like to have.
- Item length ms: How long is each item. If you are making videos, 5000ms or 9000ms are good starting points.
- Gap between: how much empty space between generated items
- Pro tip: LLM’s tend to output different results each time. Do multiple generations for the same lyric set, always exporting the results to image track. Then generate the images. While waiting, you can iterate more rounds with LLM. After you have enough images to fill all the gaps, start fine tuning!

Integrated Stable Diffusion / local generation
Stable Diffusion is now integrated (as a plugin) to Lyric Video Studio. Integration includes presets for supported model types. SD 1.5, SDXL, SD3 medium and Flux 1 & 2, QWen image, Z-image (aka ZIT image) and Ovis image are supported. Also LoRa’s are supported. From Track settings, you must first choose the folder, where your models are. Recommended folder structure would be to place different types of models to subfolders and LoRa’s for those to subfolder as well. For example c:\models\sd1.5 and c:\models\sd1.5\loras. In this case, c:\models should be set as model path in General Settings of this plugin.

- Model selections. Not all types require everything, here’s list of needed models with links
- SD1.5: https://huggingface.co/runwayml/stable-diffusion-v1-5/resolve/main/v1-5-pruned-emaonly.safetensors
- SDXL: https://huggingface.co/stabilityai/stable-diffusion-xl-base-1.0/blob/main/sd_xl_base_1.0.safetensors and https://huggingface.co/madebyollin/sdxl-vae-fp16-fix/resolve/main/sdxl.vae.safetensors
- SD3: https://huggingface.co/stabilityai/stable-diffusion-3-medium/resolve/main/sd3_medium_incl_clips_t5xxlfp16.safetensors
- FLUX: https://huggingface.co/second-state/FLUX.1-dev-GGUF/tree/5f485eae3ac4edfe5bd8c32534665882cb2ab696 You need all four files from there, .gguf, ea.safetensors, clip L and t5xxl
- For LoRa’s, you can search for them for example from https://civitai.com Make sure you match the LoRa type with the model type, meaning sdxl can only use LoRs’s made for sdxl. There’s usually reference prompts for using the loras, like in this one: https://civitai.com/models/123085/sauron-lora-sdxl
- NOTE: Upscaling moved since Jan 2026. Now available in image and video items, right click context menu
- Implementation is based on stable diffusion.cpp, more info here: https://github.com/leejet/stable-diffusion.cpp/?tab=readme-ov-file
- Select your device. Currently only Nvidia / cuda and cpu are supported. Using cpu can be slow! On first run, application fetches required libraries. If you already have Cuda toolkit 12.x installed, this step is skipped.
- After launching application, first generation loads the model to memory and releases it after timeout. Timeout is changed from plugin setting. If you wish to release the GPU memory right away, there’s a button for that.
Note: it’s is known issue that with some models (especially when there’s low step count), the ETA progress does not really show anything useful and might even look 100% the whole time
Effects
This section goes through some of the more advanced techniques that you can do with regular effects and fragment shaders
Basic effect system
Number transitions are the basis of the effect system and you can do wide variety of transitions and effects with it. In practice, it allows you to animate all values that are editable. Here’s basic walk-through of the essential tricks with number transitions
- Transition type
- ‘Current + delta’ means that the ‘Delta change’ value is added to current value of the item, at that time. For example, move item -25px during the time on effect
- ‘Start to end’ allows you to choose the starting and ending value for the transition
- Random range makes the delta value variate the amount you define. Random seed is per item and loop. This adds some variation to item effects, for example in case of moving the item in screen. Example values of delta -25 and random range 50 makes the delta variate between -25 – 25
- Start / end time
- Relative effect start / end starts the effect when based on the length of the item. This is useful when you have many items that are relatively same length and want to transition them consistently
- Absolute means the absolute time how long the item has been rendered. For example ‘start transition at 400ms after item appeared’. This mode allows also negative values. -400 = Start transitioning when there’s 400ms left of item to be displayed’. This also works for end value. In the example below, there’s 10ms effect looped 20x times, starting when 400ms before item end
- Static means that effect is applied immediately to item and stays on for the duration it is visible. This should be mostly used for effects like blur or color transition (make some of the texts different color without assigning font override to it)
- Reverse towards end means that delta value is transitioned back to original when nearing towards end. Effect start time is used on that case. This is equivalent of ‘in/out’ effect and useful for example in opacity transition
- Loop effect makes the effect loop as many times that count is. For example blink color of the item
- Continue after end means that the delta is kept added to item as long as it’s visible. This is used to define for example continuous rotation for the item. You would achieve same by adding ridiculously high delta value, but it’s easier to define it like ‘rotate 20 degrees in second and keep going’
- Easing curve dictates how the value is transitioned to desired value, see https://easings.net/ for reference and examples
- Reset delta/end random seed (also for start) resets the random seed assigned to item when it is first time animated with random value. Random value is stored so that randomized animation are consistent between runs and render. You can get new random with the button, if the effect is now “strong” enough.
- Override parent effect means that if same effect is applied on track or project level, this effect instance is used instead, if checked. Project and track level effects allow more consistent way of transitioning items. But sometimes, you might want one specific item to get bit different sort of transition to mix things up.

Partial blur
This can be achieved by combination of two tracks, blur effect and mask.
- Start by creating image track and add image of your choosing to that track
- Duplicate the track below the first track
- Click on the image item on timeline to open settings and select “Effects” -> “Add new effect” -> “All” -> “Blur”
- Set start & end types of both sigmas to static. Adjust “Delta change” to make the image more blurrier.
- Next, to the same track (duplicated, last one), click “Edit masks” -> “Add new mask” and define the mask properties.
- When closing the mask view, you can see that the blur now affects only the masked area
- Note that you can animate mask properties to make it moving, if needed


Radial blur
Radial blur can be achieved by using fragment shaders. Radial blur can be applied to text as well. Choose by clicking video or image to show the effects
- Expand “Shader” in image settings
- Click “Select shader” -> “Effects” -> “Radial blur”
- Use “Blur strength”, “Blur center % X” and “Blur center % Y” to adjust the effect power and center point. These values can be animated also.


Color transfer
You can match colors between images and videos to make separate takes to look more consistent.
- Start by adding Color correction-plugin track (image or video), we’ll use video in this example
- Import videos from track
- Select reference video from dropdown and select reference frame frame. This frame will be used to all videos in this track
- Optionally click “Preview” to convert the selected frame (left-most slider)
- Click generate (or generate all) to do final color conversion


Project collaboration / sharing / plugin content delivery
If you have opt-ed in to either DropBox or Google Drive (Settings -> Plugins -> Plugin Content Delivery), you can share your project via cloud. First, start by choosing your choice of service:

Clicking the ‘Refresh Credentials’ will choose the service and open up your browser for login. Application receives temporary access token you your cloud service. The service is used for two purposes:
1. Uploading images / videos for the purpose of image-to-video or video manipulation. Many video service providers require this for creating videos from images.
2. Storing the archived project for easier sharing. Open your project settings (P or from View menu), then click “Archive and upload”. After project archive is created and uploaded, the public link will be displayed on the text box

You can copy the link by clicking the box and then send to your collaborator or band mates, for example. Link is pasted to popup that is opened from this menu


Note that trial version of the app can also open the archive. None of your access tokens (of plugins) is shared with the project. Your prompts however will be shared, along with everything else you see on the timeline. Also note that if you opt-in for DropBox, the link is valid only for four (4) hours
Recording video and audio
You can record video and audio directly to timeline. First, start by selecting devices:

Video and audio recording devices are separated between video and audio tracks. When recording video, audio is recorded simultaneously with the selected audio device. This will help you to align the audio with video automatically. Different devices can have different latencies, so offset is used for that.
You can record very low latency audio with ASIO devices as well. From Audio driver, choose something different than default to see the audio options. You can record video at the same time too. First, click R to start audio recording from audio track, then click R from video track. “Audio recording offset ms” value is used for aligning the audio. Different video input devices have various start up latencies, so after you have found the perfect offset value, you no longer have to manually align the video and audio. Video recording LITE version is limited to 20 seconds. Main function of the video and audio recording is to allow easier integration to genAi services, without swapping applications and finding clips manually.
MILKDROP Visualizations
Remember Winamp? From the 2000’s? Their audio reactive engine and presets are now integrated to Lyric Video Studio. You can create audio-reactive backgrounds for your video and use custom presets. Default preset pack includes whipping 8000+ presets. Firs, start by importing audio to project. Then, right click on the audio item and select “Create audio-reactive background”. On first time, couple of settings are asked, for the preset folder and downloading the preset pack. Full screen windows opens up, where you can choose settings and visualizations for the audio. When ready, press “Render sequence” to create the frames that the main app will then import as video item. For ultimate sharpness and blending the video, choose the transparent background. Do notice that the render size and time will be quite big then.


Advanced MilkDrop presets & management
- While the visualization window is open, you can change the preset position from timeline. Visualization view jumps to same position that the main app
- Click preset to add it to current position. Clicking some other preset will swap it with the current one in the playlist. (Upcoming feature: ability to select the preset from the visualization ui so that the preview position jumps to same place)
- Keep adding presets until you’re happy with the results
- Click ‘Save’ to send the playlist to the audio item that is used for the visualization. Next time you open the same audio file for visualization, it will load the same playlist
- Click “Render” to finalize the visualization
- Note that currently the visualization does not support “soft” clipping of the audio. If you have adjusted the audio start & stop positions and would like to render only that part, right lick on audio and select “Apply clip / trimming” and start visualization again from the newly created audio item.
- Playlist items will transition automatically currently. If you would prefer hard cut, please use the contacts page to request a feature
Automatic video clipping
You can trim videos automatically based on video audio volume. This saves a lot of time when you have long video, tutorial for example, and you want to take out the parts where you freeze 😀
- After importing video to timeline (like drag & drop file to app), right click it and select “Trim silent parts”
- Click “Analyze”. You need to do this only once per clip
- Then you’ll have some options to choose from
- Threshold % is the volume level that will remove parts that are below that. Volume level is the % is calculated from the minimum and maximum volume of the clip
- Start / end padding (ms): This defines how much video will be taken before or after the non-silent part is taken
- Minimum length (milliseconds) defines the minimum length of preserved clips, allowing you to filter out very short clips

After you have selected the values, click “Preview”. This will calculate the clips that will be preserved and shows them. This will not yet cut the clips, but will allow you to find good settings

After you’re happy with the proposed clipping, click “Process”. This will create new clips non-destructively. If you need to cancel the operation, just delete all other clips but the first (Note: on second clip, right click, then ‘Select->Forward’ to select that and all after that) and trim the clip to original length (you can use ‘Extend to max’ from context menu)
Live Streaming to OBS & VJing (aka Spout)
1. Send to OBS / Live Streaming
You can broadcast your lyrics live to external software like OBS Studio, Resolume Arena, or TouchDesigner in real-time.
- How to enable: Open Project Settings and toggle “Send to Spout”.
- Transparency: For the best results in OBS (overlays), set your background to Transparent. Click the color box next to “Background color” and drag the Transparency slider (Alpha) to zero.
- Connection: In your receiving software (e.g., OBS Spout2 Plugin), select “LyricVideoStudio” as the source.
- Click “Play”-button > or space in Lyric Video Studio
2. Record from External Sources
You can use Lyric Video Studio to record visual output from other apps (like generative visualizers).
Setup: Go to Settings -> Audio and Video. Select “Spout” as the Video Device.
Recording: Click ‘R’ on the video track. A popup will appear listing all active Spout senders (e.g., “Resolume”). Select one, and recording will start immediately matching your project’s framerate.
MCP
You can use LVS also with LLM models, enabling agentic workflow mode. See further instructions here! You can use for example openAi’s modes with Visual studio code or Codex.